
 +31 638047308
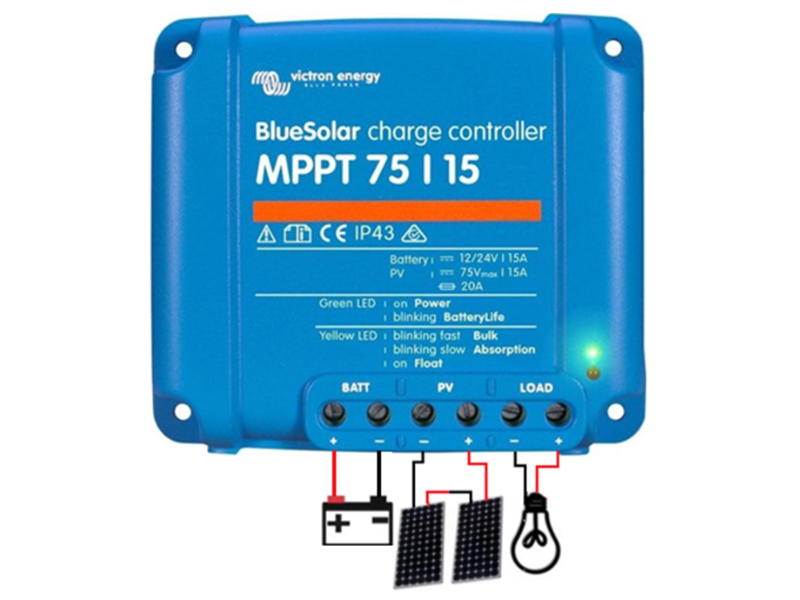
Many people think that installing solar panels on a camper, caravan or boat is very difficult. In this blog, you will discover that it is actually very easy, even without any prior knowledge!
Please note: these instructions only apply to the solar panel kits from our website.
Preparation:
Before starting the installation, it is useful to do some preparatory work in advance.
- Solar panels:
Below you will find all the dimensions of our solar panels. Measure the roof or deck and decide where you want to place the solar panel or solar panels.
Flexible solar panels:
JaDaStroom flexible solar panel 55Wp (Dimensions: 58 × 54 × 0.2 cm)
JaDaStroom flexible solar panel 110Wp (Dimensions: 108 × 54 × 0.2 cm)
JaDaStroom flexible solar panel 200Wp (Dimensions: 1435 × 710 × 3 mm)
JaDaStroom flexible walkable solar panel 120Wp Premium (Dimensions: 107 × 54 × 0.2 cm)
Rigid solar panels:
Sungold Solar 115Wp monocrystalline solar panel (Dimensions: 1195 × 545 × 35 mm)
Victron BlueSolar 185Wp monocrystalline solar panel (Dimensions: 1485 × 668 × 30 mm)
For rigid solar panels, an additional 7 cm is added at the front and back due to the spoilers. Also consider how you will mount the solar panel or panels — a good option is using adhesive or sealant. Make sure the adhesive is strong enough and suitable for the surface, and that it is weather- and heat-resistant.
- Charge controller & Cable:
Decide where you want to place the charge controller and consider the following points:
Cable lengths: Our sets include 5 meters from the solar panel to the charge controller and 2.5 meters from the battery to the charge controller as standard. Contact us for other lengths.
In addition to the cable lengths, it is important to consider how often you want to read the charge controller data. If you want to monitor it frequently, it is best not to install it too far away. Prefer to store it out of sight but still keep everything under control? Then choose a charge controller with Bluetooth — you can monitor everything via the VictronConnect app.Tip: The VictronConnect app is free. You can download it in advance and select a demo product to see what features the app offers!
- Roof cable gland / Roof entry:
Also decide in advance where to place the roof cable gland. The cables enter the interior through the roof entry. We offer a double roof cable gland, through which both 5-meter cables are brought inside.
The installation:
After the preparation work, the installation can begin. The installation is quick and not difficult. However, it is important to connect everything carefully — this is also explained in this blog.
With the solar panel kit, you receive step-by-step instructions, a schematic diagram and the charge controller manual. Always read all instructions included with the kit carefully. The instructions provided with the kit are leading, as they may vary slightly per set. This guide shows how easy it is to connect a JaDaStroom solar panel kit. If you get stuck, please feel free to contact us!
Step-by-step instructions:
Step 1: Always read the charge controller manual carefully. If anything is unclear or if you have doubts, please contact us!
Step 2: Mount the charge controller in the caravan, camper, boat or van. You can use the mounting holes on the side of the charge controller.
Step 3: Connect the cables from the charge controller to the battery. Unscrew the ports of the charge controller, insert the cables and tighten the ports again. In the schematic diagram (see also the section “Difference between series and parallel”) you can see which cable goes into which port — it is also colour-coded for clarity.
Step 4: Select the correct battery type. This is described in the charge controller manual. For charge controllers with Bluetooth, you can download the app and adjust the battery type in the settings. Charge controllers with a display can easily be configured using the buttons.
Step 5: Place the solar panel(s) at the mounting location. It is important to always cover the panel(s). JaDaStroom solar panels also generate power on cloudy days, so they must be covered even then. Then fix the panels to the roof or deck — many of our customers use adhesive or sealant for this.
Step 6: Connect the solar panel cables to the charge controller (whether the panels must be connected in series or parallel depends on the kit — this is also indicated in the schematic diagram. The difference between series and parallel is explained below).First connect the cables to the charge controller using the screw terminals. Then connect the ends with the MC4 connectors to the solar panels — simply click the connectors together.
Step 7: Enjoy your kit!
Difference between series and parallel connection:
In a series connection, you connect the female connector of solar panel A to the male connector of solar panel B. After that, both panels have one free end — this is where you connect the 5-meter cable.It may sound complicated with male and female connectors, but it is not. A male connector does not fit into another male connector, and a female connector does not fit into another female connector. Since the male connector only fits into the female connector, incorrect connection is impossible.
Below is an example of a schematic diagram where the solar panels are connected in series.

In a parallel connection, you use a splitter kit. You connect the two male connectors of the solar panels (one from each panel) to splitter A and the two female connectors (also one from each panel) to splitter B. Then two ends remain — this is where you connect the 5-meter cable.
Below is an example of a schematic diagram where the solar panels are connected in parallel.

Conclusion:
Installing a JaDaStroom solar panel kit is very easy. Even without prior knowledge, it is simple to install — so there is no need to hire an expensive installer.
Do you have any questions about the installation? Feel free to contact our team! Discover all our solar panel kits for boats and campers here!